My second bracelet using the Dainty Blossoms pattern from my 11/8/13 post. Marcia Balomis' original pattern, with my version being pared down with fewer flower petals ... (3) shades of red petals, gold bricks, 15.0's around each petal and 15.0's and 11.0's down the side to hide the stitch pattern. I also used 15.0 metallic green around the pearl in middle of each flower, which I think really helps to hide the thread. These bracelets really live up to their given name. I'm still struggling with the petals not breaking after completion - something is cutting through the fireline, and I'm not sure if it's the seed beads or the petals, but I'm determined to figure this out. They are just so adorable, truly dainty, and very photogenic!!!! Stay tuned...
11/19/2013
11/12/2013
Tagua Nut Inspiration/ Leather Wrapping Project
Necklace, earrings and wrap bracelet for a special birthday girl!. My friend Aimee, who is the very talented girl who got me started beading, oh so many million beads and $$ ago....just celebrated her day. So, here's what I made for her. My inspiration started with the necklace, using tagua nut rounds, leather strapping and a wood art tile pendant from J-Lynn Jewels. J-Lynn does lovely tiles in wonderful color combinations, and her pendants are so light and easy to wear. Then I made the earrings to match, and these are just "so Aimee"!!!! I randomly thought to insert the etched silver plate rounds inside the tagua nut circle to dress them up, and voila - it worked... perfectly I think!
![]()
Here's the necklace. I was having trouble getting a good picture in the right light. One is overexposed and the other is a little dark, but you get the gist... A really simple idea, but goes with anything and easy to wear with a magnet closure.
The earrings are tagua nut rounds, silver plate etched rounds inserted in the middle of the tagua nut centers, 8mm fire polish and 4 mm pearls and czech glass rondelles


 |
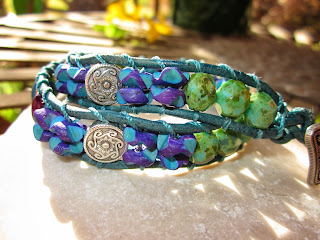
| And, arent these colors gorgeous together? 8mm fire polish, silver spacers, wood oblongs, wood multi angle cut spacers and lots of needle pricks in my fingers later... I wanted to toss this bracelet across the room a couple of times. The thread I chose was thicker than I thought, and it did not want to go through most of the beads twice, so I struggled each time. Ahhh, at least the end result was worth the swearing, sore fingers and bleeding... :) I learned to make my first leather wrap bracelet at where else? Bead Street of course! |
 |
Here's the necklace. I was having trouble getting a good picture in the right light. One is overexposed and the other is a little dark, but you get the gist... A really simple idea, but goes with anything and easy to wear with a magnet closure.
The earrings are tagua nut rounds, silver plate etched rounds inserted in the middle of the tagua nut centers, 8mm fire polish and 4 mm pearls and czech glass rondelles


11/08/2013
DAINTY BLOSSOMS BRACELET
This dainty, beautiful pattern is a design by Marcia Balonis, 2013 Starman Trendsetter designer, called Burgeoning Blossoms. Class taught by Sandy at my favorite shop, BeadStreet. I started a bracelet in class and just didn't feel like it was my best work, so came home and tore it down and started over. I actually did things a little differently the second time around. I went through each of the bricks twice as I made the base, then spaced the flower petals out over the bracelet (using half as many) so I could see the Czechmates bricks underneath. The brick beads are beautiful in their own right, and while they provide a sturdy base for the petals, I wanted to showcase them as well. I also did a trim of 15.0 and 11.0 sb's along the outer edge on both sides to cover my stitch pattern, and while the pattern uses 11.0 seed beads to wrap around each flower, I used 15.0 sb's and also inserted 15.0's around the pearl in the center of the flower. This design is very dainty around the flowers, and I found I had to really be careful (I stitch very tight!) as I wrapped them underneath, or the flower would disintegrate before my eyes. That's when I started crying... LOUDLY!

This shot better shows the braided effect of the 15.0/11.0 sb trim down the sides of the bracelet.
 |
| Love the milky colorations and specks of color on these 8mm Czech petals. I used three different colors, all from BeadStreet |
 |
 |
| I added a brass flower button for my closure with peyote stitch loop (of course)! |
 |
| The bricks show nicely underneath, and enough through the top to give that added pop of color. |

This shot better shows the braided effect of the 15.0/11.0 sb trim down the sides of the bracelet.
11/01/2013
LENTILLE BRACELET, two versions of the same pattern . . .
 |
| MY FALL COLORS adorn this wonderful pattern. A class at Bead Street taught by Sandy, using an Adele Kimpell pattern, "Lentille Bracelet". This was my second bracelet - my first is below. On this version I took it down a slightly different path, using both two hole Czechmate lentils in the shiny bronze, and a variety of fall colored super duos. It's yummy if I don't say so myself. The herringbone tube-like pattern was very fun, and since I had struggled with this stitch on a previous project, I had it down this time! I used a multi-mix tube of matte 11.0 seed beads in copper/yellow tones and shiny gold (permanent finish) 11.0's down the center for a little pop. |


Subscribe to:
Posts (Atom)


